Our Newsletter
Sign up for our e-mail newsletter and stay informed for what’s next on the horizon.
Does the task of how to install a new GPU (Graphics Processing Unit) in a PC seem overwhelming? We know many have shared their concerns about this process, so we are here to clear the doubts and guide you through each step.
From picking the suitable GPU and getting your computer ready, to hooking up the power supply, setting up the required drivers, and even troubleshooting, we will guide you through it all.
However, what could happen if these steps aren’t followed meticulously? Let’s get into the conversation and see.
The process of setting up a new GPU seems less complex now, doesn’t it? From selecting the suitable card, preparing our computer, linking power, and updating software, it’s quite a comprehensive task.
Nonetheless, when compared to the satisfaction of a successful setup and improved computer performance, the effort seems justified.
Remember, patience is crucial for this technical assignment. So, pat yourself on the back, because we just upgraded our computer’s visual performance together.
Before we begin the installation process, it’s important to know that graphics cards, also referred to as GPUs, are specific processors designed particularly for graphics processing. These pieces of hardware are like mini computers, outfitted with their own RAM and cooling systems for peak performance. They manage graphical data and supply the output for your monitor, a challenging task that today’s graphics cards execute with remarkable efficiency.
When we choose to integrate a new GPU, it’s not as simple as just connecting it into any slot. It must be inserted into a PCIe slot, a kind of expansion slot found on your motherboard. This is how the GPU interacts with the rest of your computer.
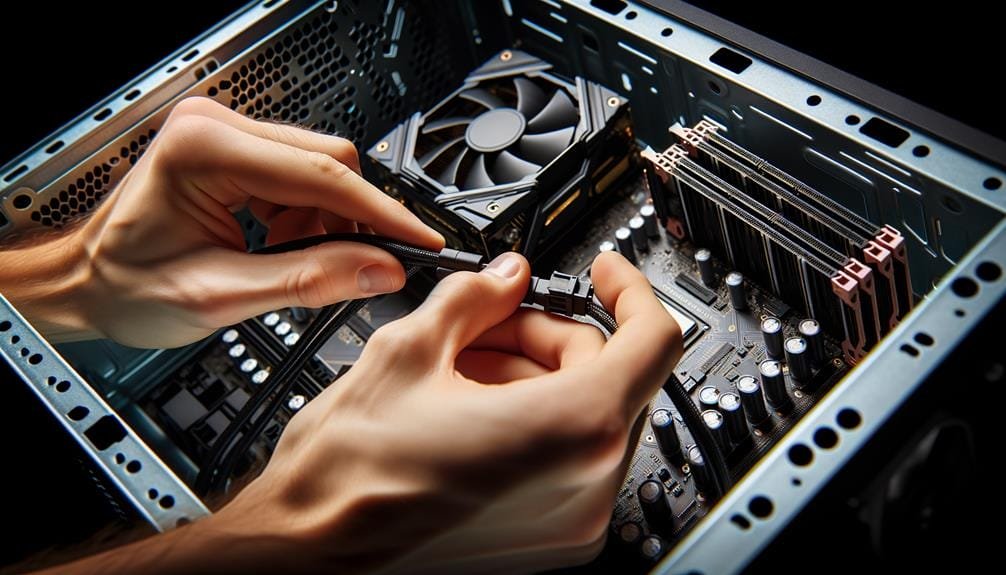
Inserting the GPU into the PCIe slot is just a portion of the installation process. We also need to link it to the power supply unit (PSU). Contemporary graphics cards often demand multiple power connectors, so we must ensure our PSU has a sufficient quantity. It’s also vital to securely remove the previous card before setting up the new one.
After grasping the fundamentals and prerequisites of a GPU, we are now ready to focus on identifying the appropriate graphics card for our needs. The key considerations for a GPU are its performance, energy usage, and compatibility. Ensure the graphics card is compatible with your PC case, an element referred to as the form factor.
Additionally, power requirements ought to be considered. Verify that your power supply can accommodate the GPU you select. The cooling mechanisms differ among GPUs, therefore, it is advisable to investigate and choose one that fulfills your needs.
Above all, the value of benchmarks and reviews cannot be overstated. They provide an understanding of practical GPU performance, assisting in making an informed decision. Refer to the table below for guidance:
| Factor | Detail | Importance |
|---|---|---|
| Performance | GPU’s processing power | Directly affects gaming and rendering |
| Power Consumption | Energy the GPU uses | Impacts electricity bill and heat generation |
| Compatibility | GPU’s form factor and power requirements | Determines if GPU fits and works in your system |

To guarantee a seamless and successful integration of our new GPU, our computer needs to be adequately prepared by adhering to several critical steps. We’re going to guide you through the procedure, ensuring that you’re armed with the necessary knowledge and independence to confidently tackle this mission.
Before we even think about inserting our new graphics card into the PCIe slot, we need to:
Utilizing an anti-static wristband is also strongly suggested, providing extra safeguard against static discharge. Keep in mind, we’re interacting with delicate components inside the PC that can be easily compromised. Properly preparing our computer aids in preventing any unnecessary complications during the GPU integration process.
Now that our computer is suitably prepared, let’s proceed with the actual process of installing the graphics card. We’ll begin by identifying the PCIe slot on the motherboard. Be cautious of static electricity, which can damage sensitive electronic components.
Here’s a sequential table to guide us through:
| Step | Action |
|---|---|
| 1 | Identify the PCIe slot, remove its protective cover |
| 2 | Line up the graphics card with the PCIe slot |
| 3 | Firmly push the graphics card into the slot |
| 4 | Fasten the graphics card with screws or latches |
| 5 | Attach the required PSU power cables to the graphics card |
The aim is to ensure the graphics card is correctly positioned in the PCIe slot to prevent connection problems. Once the GPU is firmly installed, we stabilize it using the provided screws or latches. This stops movement or disconnection. The final step involves attaching the PSU power cables to the graphics card. This guarantees it has sufficient power for operation. Always make sure the PSU power is enough for your new GPU.
At the rear of the PC, you’ll find the display connectors, all prepared to have the drivers installed. This concludes our guide on installing a new GPU.
Next, we’ll cover the process of linking the power supply. This involves recognizing the right connectors on both the power supply unit and the GPU.
Following that, we’ll assist you in ensuring a reliable and secure connection for optimum GPU performance.
Before we move forward with the installation, let’s first recognize the appropriate power connectors on your new GPU. These could be 6-pin, 8-pin, or dual connectors, based on the model and its power requirements. Connecting power incorrectly can cause performance problems or even damage to your graphics card.
To prevent such issues, here’s what we need to bear in mind:
After determining the appropriate connectors, it’s vital to ensure a safe and correct connection to the power supply to prevent potential harm to our new GPU.
Prior to proceeding, we should verify the power supply requirements of the graphics card that we plan to install. This verification step ensures that our Power Supply Unit (PSU) can supply sufficient power.
It’s essential that we employ the correct power cables from the PSU to link to the PCIe slots on the GPU. We should refrain from using adapters or splitters during the power connection process, as they can lead to damage.
Confirm that the power connectors are firmly plugged in to guarantee a secure connection and prevent power-related problems.
Always consult the GPU manual or adhere to the manufacturer’s guidelines for specific power supply suggestions when setting up a new GPU.
After the physical installation of the graphics card, it’s time to focus on one of the most crucial aspects: connecting the PCI-E power cables. This step is essential in learning how to install a new GPU as it directly impacts the functionality and efficiency of your new hardware.
To guarantee the best performance and compatibility from your new GPU, it’s vital to install and regularly update the drivers downloaded from the producer’s website. As you set up a new GPU, the importance of new GPU drivers can’t be overstated. They facilitate the hardware’s interaction with the operating system, thereby boosting the graphics and overall performance of your system.
Here’s a detailed procedure on driver setup and updates:
Driver updates should regularly be part of your system care to prevent compatibility complications and harness the complete potential of your GPU. Don’t undervalue the significance of consistent updates; they frequently offer vital fixes and enhancements. By sticking to these steps, you’re ensuring that your new GPU will serve you well and offer the benefit of impressive visuals and seamless gameplay.
Post-Installation Inspection: Ensuring GPU Functionality
Upon successful installation of your new GPU, a meticulous post-installation inspection is paramount to ascertain its optimal functionality.
We’ve simplified the method of installing a new GPU, haven’t we? From choosing the appropriate card, readying our PC, to connecting power and updating software, it’s a thorough process.
However, when weighed against the gratification of a successful install and enhanced PC performance, the effort appears to be worth it.
Keep in mind, patience is vital in this technical task. So, give yourself a round of applause, because we’ve just improved our PC’s graphics capabilities together.