Our Newsletter
Sign up for our e-mail newsletter and stay informed for what’s next on the horizon.
As the saying goes, ‘A journey of a thousand miles begins with a single step.’
Likewise, the path to a fully operational computer starts with the correct setup of the Central Processing Unit (CPU).
We’re here to assist you in navigating this process, step by detailed step. From grasping the critical role of a CPU, securing it on the motherboard, to addressing issues after installation, we’re by your side.
Fear not, although this might seem challenging, with our help, you can manage it seamlessly.
So, let’s not delay and commence this journey in unison.
Aren’t you curious to know what the next step is?
Like an adept conductor directing an orchestra, we’ve guided you through the intricate steps of CPU installation. Our instruments have functioned in harmony, ensuring the synchronization of motherboard and CPU.
With precision, we’ve positioned the CPU into its socket, fastening it with the control of a conductor’s baton. This is the peak of our process, leaving us prepared for the subsequent stage of problem-solving.
That’s the craft of CPU installation, a complex routine we’ve now made familiar.
Your PC is prepared to function!
To truly value the function of the CPU in a computer system, one must comprehend that it functions as the ‘brain’ of the system, carrying out instructions, initiating programs, and administrating all input and output operations. It’s the CPU that contributes to the overall speed and processing capabilities of your computer.
Grasping the importance of a CPU is vital, particularly if you’re planning to set up a CPU. Importantly, CPUs aren’t universally compatible. Different CPUs come equipped with varying numbers of cores and threads, which determine their multitasking and processing abilities. For example, a CPU with a higher number of cores can manage multiple tasks at the same time, offering a more seamless and efficient computing experience.
However, it’s not solely about the quantity of cores. The fitness between the CPU and the motherboard is also a vital factor. An unsuitable match won’t function effectively, and in the worst cases, it could even lead to system instability.
In essence, the CPU is the core of your computer. By completely understanding its function and significance, you’re taking an important step towards achieving fluidity in your computing experience. It’s not just about knowing how to set up a CPU; it’s about understanding its relevance.
Before we start the CPU assembly, it’s important to make sure we have all the required tools for CPU installation. These tools play a vital role in ensuring a correct CPU installation and guaranteeing your new CPU performs to its best.
Here’s a brief overview of the required tools for CPU installation:

Proceeding to the vital phase of assessing CPU and motherboard compatibility.
Comprehending the compatibility between these two components is essential because different manufacturers employ different socket types.
We’ll pinpoint compatible components and troubleshoot any potential compatibility problems to guarantee a successful installation.
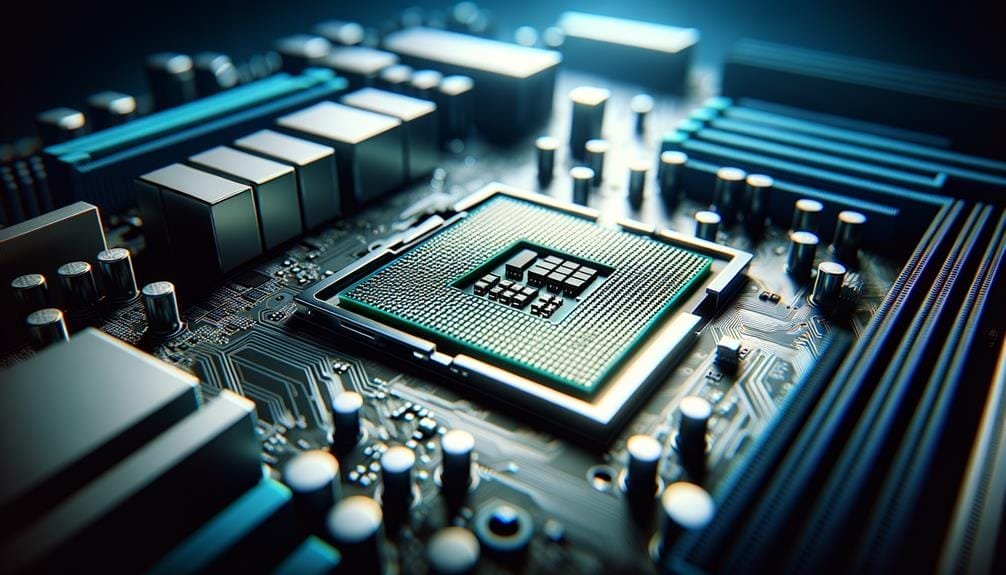
First, let’s appreciate the necessity of verifying the compatibility of our CPU and motherboard, specifically ensuring the socket type of the motherboard aligns with our new processor. This step, referred to as comprehending CPU-motherboard compatibility, is vital for a successful CPU installation.
Understanding the significance of CPU-motherboard compatibility, we now proceed to the process of recognizing compatible components, an essential prerequisite for a successful CPU installation.
The primary step is to verify the CPU socket type of your motherboard, which needs to be compatible with your new Intel or AMD processor. It’s crucial to acknowledge that not every processor from the same manufacturer utilizes the same socket, and Intel CPUs can’t be fitted on AMD motherboards, or the other way round.
If there’s doubt, refer to your motherboard’s manual or use the CPU-Z application to identify the socket. In situations where the manual isn’t present, a visual check may be useful. For older computers, think about purchasing a new motherboard as finding matching sockets can become challenging over time.
When we run into compatibility issues between the CPU and the motherboard, there are certain steps we can take to troubleshoot the problem. In our easy guide: cpu installation, we can utilize a few troubleshooting methods:
Before we move forward with the actual CPU placement, it’s paramount to verify that the motherboard has a compatible CPU socket. This compatibility is a fundamental part of preparing the motherboard for the CPU. It’s not just about size compatibility; the motherboard also needs to fulfill the CPU’s power needs and functionalities.
Next, assemble the required tools. A screwdriver and thermal compound are must-haves. The thermal compound facilitates heat conduction from the CPU to the cooler, an important step to avoid overheating.
Following that, set up your workspace. Make sure it’s tidy and devoid of static electricity which can harm fragile components. A static wrist band can be useful in this situation.
Lastly, unplug the power supply. Safety is always a priority. Take off the computer case cover to reveal the motherboard. Handle it gently, it’s a delicate piece of hardware.
Once the motherboard is ready, it’s time to proceed to the critical task of accurately positioning the CPU in its socket, ensuring a perfect correspondence between the CPU markers and the socket markers. This ‘Correct CPU Placement Procedure’ is a crucial part of the ‘Step-by-Step Guide: CPU Installation’ and should be handled with utmost caution to avoid any potential damage.
Here’s a quick summary of the process:

After confirming that the CPU is properly aligned in its socket, we’ll now concentrate on securing it firmly on the motherboard. This is a critical part of this step-by-step manual: CPU installation, where we need to ensure that the CPU is correctly placed and comfortably seated in the socket. A slight adjustment might be needed if it appears a bit off, but take note, forcing it could cause damage.
Subsequently, we’ll lower the retention arm. This motion should be smooth and shouldn’t require a lot of force. If you encounter any resistance, it’s an indication the CPU may not be properly seated in the socket. At this juncture, you should raise the arm, double-check your CPU’s alignment, and attempt again.
With the CPU installed and the cooler properly secured, we must proceed to conduct critical checks post-installation and address potential issues that may emerge. We’ve accurately placed the CPU into the socket and ensured it’s correctly seated. Still, there are a few steps to complete.
It’s of utmost priority to verify that everything is functioning as anticipated. Here’s a checklist that we’ll adhere to:
Lastly, be prepared to address any startup issues or system instability that may emerge following the CPU’s installation.
Like a proficient conductor leading an orchestra, we’ve supervised you through the detailed choreography of CPU installation. Our tools have moved in sync, ensuring the coordination of motherboard and CPU.
With accuracy, we’ve placed the CPU into its socket, securing it with the control of a maestro’s baton. This is the climax of our procedure, leaving us ready for the following act of troubleshooting.
That’s the art of CPU installation, a complex dance we’ve now made familiar.
Your PC is ready to perform!